
Understanding Automotive Base Coat Paint
Before diving into the process, it is important to understand what base coat paint actually is. The base coat is the colored layer applied to a vehicle after the primer. It provides the visual color and effect, whether solid, metallic, or pearlescent. This layer is typically followed by a clear coat that adds gloss and protection.
When working with automotive finishes, the quality of your automotive basecoat plays a major role in the final outcome. Cheap materials often lead to uneven coverage, fading, or peeling over time.
Tools and Materials You Will Need
Preparation starts with gathering the right tools and supplies. Here is what you should have on hand:
- Automotive base coat paint
- Primer and clear coat
- Spray gun and air compressor
- Sandpaper in multiple grits
- Masking tape and paper
- Degreaser or surface cleaner
- Tack cloth
- Protective gear including gloves and respirator
Having everything ready before you begin ensures a smooth workflow and reduces the chance of mistakes.
Step 1: Prepare the Surface
Proper surface preparation is the foundation of a successful paint job. Skipping or rushing this step often leads to poor adhesion and visible imperfections.
Start by thoroughly cleaning the vehicle to remove dirt, grease, and contaminants. Use a degreaser to eliminate any oils that could interfere with the paint.
Next, sand the surface using medium grit sandpaper. This creates a slightly rough texture that helps the primer and base coat adhere properly. After sanding, wipe the surface with a tack cloth to remove dust particles.
Step 2: Apply Primer
Primer serves as the base layer that ensures even color distribution and strong adhesion. Apply a thin, even coat of primer using your spray gun. Allow it to dry according to the manufacturer’s instructions.
Once dry, lightly sand the primer with fine grit sandpaper to smooth out any imperfections. Clean the surface again with a tack cloth to prepare for the next step.
Step 3: Mask Off Areas
Before applying the base coat, protect areas you do not want painted. Use masking tape and paper to cover windows, trim, tires, and other components.
Careful masking prevents overspray and ensures clean lines. Take your time with this step, as it contributes to a more professional result.
Step 4: Mix the Base Coat Properly
Follow the manufacturer’s instructions for mixing your paint. This usually involves combining the base coat with a reducer to achieve the correct consistency.
Improper mixing can lead to issues such as uneven coverage, runs, or poor adhesion. Stir thoroughly and ensure the mixture is smooth before pouring it into your spray gun.
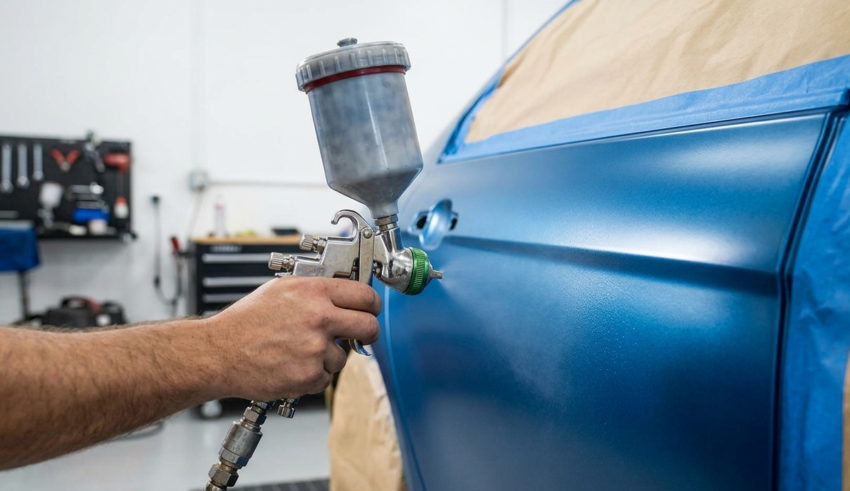
Step 5: Apply the First Coat
Hold the spray gun about 6 to 8 inches from the surface. Begin spraying in smooth, even strokes, overlapping each pass slightly to ensure full coverage.
Apply a light first coat. This initial layer should not fully cover the surface but instead act as a tack coat that helps subsequent layers adhere better.
Allow the coat to flash, which means letting it dry for a short period until it becomes slightly tacky.
Step 6: Apply Additional Coats
After the first coat has flashed, apply additional coats to build up the color. Typically, two to three coats are sufficient, depending on the paint and desired finish.
Each coat should be applied evenly, avoiding heavy application that can cause drips or runs. Maintain consistent speed and distance with the spray gun for uniform results.
Allow proper drying time between coats. Rushing this step can lead to defects in the finish.
Step 7: Inspect and Correct Imperfections
Once the base coat is applied, inspect the surface carefully. Look for any uneven areas, dust particles, or minor flaws.
If necessary, lightly sand and reapply a thin coat to correct imperfections. Always clean the surface before adding more paint.
Step 8: Apply Clear Coat
After the base coat has fully flashed and appears even, apply the clear coat. This layer adds gloss, depth, and protection against environmental factors.
Use the same spraying technique as before, applying two to three coats. Allow proper drying time between each coat.
The clear coat is what gives your vehicle that polished, showroom-quality shine.
Step 9: Final Drying and Curing
Once all coats are applied, allow the paint to cure fully. This can take several hours to a few days, depending on environmental conditions and the products used.
Avoid touching or exposing the surface to contaminants during this time. Proper curing ensures durability and a long-lasting finish.
Step 10: Polishing and Finishing Touches
After the paint has cured, you can polish the surface to enhance its shine. Use a polishing compound and a soft buffer to achieve a smooth, glossy finish.
Remove all masking materials carefully and inspect your work. The result should be a clean, even paint job that looks professional.
Common Mistakes to Avoid
Even experienced painters can make mistakes. Here are some common issues to watch out for:
- Skipping proper surface preparation
- Applying coats too thickly
- Not allowing enough drying time
- Using low-quality materials
- Incorrect spray gun settings
Avoiding these pitfalls will significantly improve your results.
Tips for Professional Results
- Work in a clean, dust-free environment
- Maintain consistent temperature and humidity
- Practice spray technique on a test surface
- Always follow product instructions
- Invest in high-quality paint and equipment
Attention to detail is what separates an average paint job from an exceptional one.
Conclusion
Applying base coat paint to a vehicle requires patience, precision, and the right materials. By following this step-by-step guide, you can achieve a smooth and durable finish that enhances the overall appearance of your vehicle.
For more beauty, care, and lifestyle insights, visit https://armourbeauty.com/ and explore expert tips that help you achieve professional-quality results.
FAQs
What is the purpose of a base coat in automotive painting?
The base coat provides the color and visual effect of the paint job. It is applied over primer and sealed with a clear coat for protection and shine.
How many coats of base coat should I apply?
Typically, two to three coats are sufficient. The exact number depends on the paint type and desired coverage.
How long should I wait between coats?
Most base coats require 10 to 20 minutes of flash time between coats, but always follow the manufacturer’s recommendations.
Can I apply base coat without primer?
It is not recommended. Primer ensures proper adhesion and a smooth surface, which are essential for a high-quality finish.
What causes paint runs or drips?
Runs and drips usually occur when too much paint is applied at once or when the spray gun is held too close to the surface.
Do I need a clear coat after the base coat?
Yes, a clear coat protects the base coat and adds gloss and durability to the finish.


